
Time to throw out the popcorn
At Mission Painting and Home Improvements we strive to not only provide you a hassle-free home painting experience but also provide you with direction to tackle some of the DIY jobs you might choose to undertake.
Many people if they look up in their homes see popcorn ceilings. Most would probably think popcorn is dated and want a cleaner look.

This is something that in a week or two you can probably knock out yourself.
This can be done by taking 3 steps: Prepare, Remove, and Repair
Prepare
1. Check for asbestos before you scrape or wet the ceiling. If the ceiling may predate 1979, do not scrape it and do not wet it. Have it tested by a professional, and hire a professional to remove it. Continue with the steps below only if the ceiling does not predate 1979, or a professional has tested it and it is not asbestos.
2. Use a small scraper to test how your ceiling reacts to being scraped. A 5 in 1 tool is often a painter’s choice for this. Some ceilings may scrape clean easily. Others, especially if they have been painted, can be more difficult to remove. If the popcorn ceiling isn’t coming down easily, this can be a good time to call a professional.
3. Remove as much furniture and other household objects as possible if you are going to do this yourself.
4. Cover floors and remaining furniture with drop cloths or plastic. Don’t underestimate the mess this can make!
Remove
Wet and scrape only after the asbestos check in Prepare step 1. If the ceiling may predate 1979 and a professional has not confirmed it is free of asbestos, stop and hire a professional.
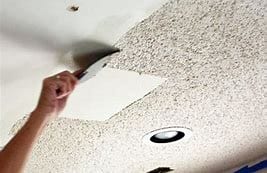
1. Wet a 3'x3′ area of your ceiling with warm water in a spray bottle. Don't overdo it on the moisture, just enough to penetrate the popcorn. Allow for the water to set in for a minute and then reapply. This will soften the popcorn ceiling and make it easier to remove.

2. Taking a small to medium size scraper, gently scrape the popcorn ceiling off, making sure you don't damage the sheet rock in the process. It is important to be careful because damage to the sheet rock is something that adds time and potentially money to your project if the damage is too extensive.
Repair
1. Take time to look over your job making note of any small gouges or mistakes you have made while removing the popcorn. It may be best to take a pencil and circle the areas of damage, so you don't miss any.
2. Spackle those areas like you would a hole or damaged spot in your wall. Allow the compound to dry overnight after you are finished.
3. Lightly sand and wipe clean the following day. Repeat the spackle if necessary.
Once you have followed these steps you are ready to prime and paint your ceiling.
While this job is something that some people will choose to undertake themselves, the professional painters and drywall experts at Mission Painting and Home Improvements are here to help you if you feel the job is too much for you.
Ready to Transform Your Home?
Get a free, detailed estimate. See why Kansas City homeowners trust Mission Painting.
Get Your Free Estimate